.svg)
How to add Tables to Webflow Rich Text

Introduction
Webflow is an incredible platform for designing and building websites with its intuitive editor and powerful features. However, you may have noticed that Webflow doesn't currently (as of July 2023) provide an in-editor option to add tables to its rich text feature. While this might initially seem like a limitation, fear not! We have an easy workaround that allows you to effortlessly incorporate tables into your Webflow rich text.
In this guide, we'll walk you through a simple and effective method that involves creating a table in applications like Google Sheets and converting it into HTML code using online tools. By following these steps, you'll be able to seamlessly integrate tables into your Webflow collections, blog posts, or any other rich text content.
Let’s dive in…
Step 1: Create the Table
To begin, let's create the table you want to include in your Webflow website. There are two ways to do this:
Option One: Creating a Table in Google Sheets
- Open up Google Sheets or your preferred spreadsheet application.
- Now, simply hover your mouse over the desired number of table columns and rows, and click to select them.

- Once you’ve completed your table, fire up your favourite web browser and head over to HTML Cleaner (you can easily find it with a quick online search).
- Copy the table you created in Google Sheets, then paste it into the designated area on HTML Cleaner's website. If the ‘paste’ option doesn’t appear when you right-click on your mouse, try clicking the ‘Edit’ button in the toolbar - there should be a paste option in there. If that doesn’t work, press ‘Ctrl’ + ‘V’ on your keyboard to paste.
- HTML Cleaner will work its magic and convert your table into custom HTML code in no time.
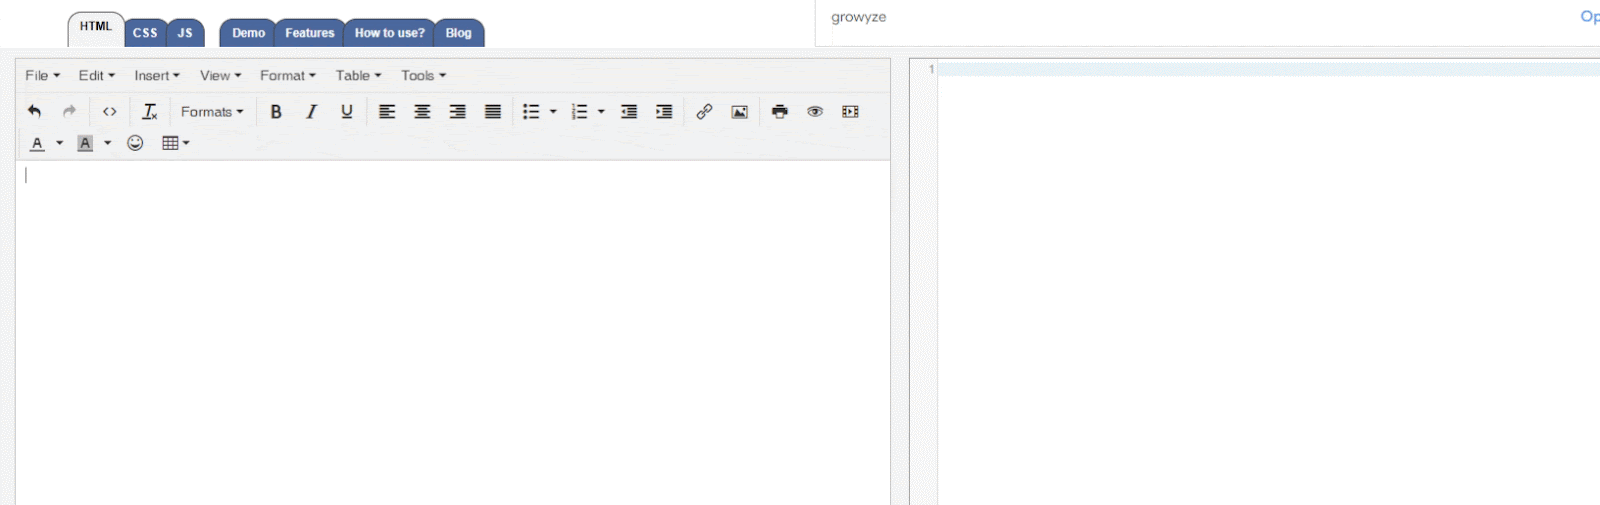
Option Two: Creating a Table in HTML Cleaner
- Open up your preferred web browser and head over to HTML Cleaner.
- Once you're on HTML Cleaner, you'll notice that it allows you to add tables and various text elements, converting them into HTML format. To create a table, find and click on the table icon and design your table.
- You will see your custom table appear in the big box. From here, you can begin entering your data into the table.
- On the right-hand side, HTML Cleaner will convert your imputed data into HTML code as you enter the data.
Step 2: Add the Table to Webflow
Now comes the exciting part - integrating your table into Webflow:
- Copy the HTML code that HTML Cleaner generated for you.
- Open up the Webflow Editor and navigate to the collection where you want to add the table (e.g. "blog posts").
- Inside the editor, locate your content rich text box and click on the plus icon that appears (if you don't see it, try pressing enter to start a new line).
- A vertical list of icons will magically appear before your eyes. Look for the brackets icon ("< >"), which represents the custom code editor in Webflow. Give it a click.
- Ta-da! A box will appear ready for you to enter some custom code. This is where you paste the HTML code you obtained from HTML Cleaner.
- Make sure to save your changes and close the custom code box to complete the process.
Step 3: View and Publish the Table
Now let's see your table in action - don't worry that it's not visible in the Webflow Editor, that's perfectly normal. In the backend UI (user interface) you won’t see the table.
- Once, you’ve finished adding to the Collection Page, go to the upper right-hand corner and save your Collection Page.
- Next, depending on what you want to do with the page, you can hit the publish button to make your changes live on your website or click ‘Schedule’ and set a designated time for that page to go live.
- Once the page is published, head over to your live website, find the blog post or collection where you added the table, and give the page a refresh.
- Voila! Your table should now appear exactly where you left it.
Conclusion
By following these straightforward steps, you can effortlessly incorporate tables into your Webflow rich text using the Google Sheets-to-HTML conversion method. While Webflow may not currently offer native table support, this workaround enables you to seamlessly integrate tables into your content.
If you’re looking for some extra help creating beautiful, data-rich pages on your Webflow-powered website, get in touch with Paddle Creative - we’re here to help!

.avif)
%20(1)%20(1)%20(1).avif)
.avif)
%20(1).avif)
.avif)
.avif)